Taro源码解读 -- taro build

近期小程序项目都使用 Taro 编写,出于好奇,准备研读一下 Taro(3.3.16)的源码,本章将会学习了解下 taro build 的运行机制,以及不同平台的编译差别。

taro-cli

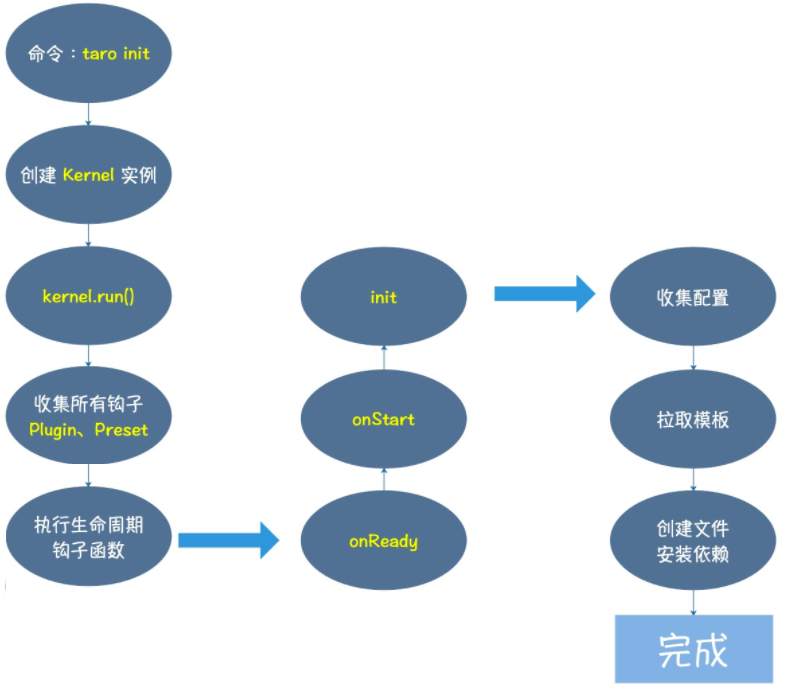
了解过 taro-cli 的实现原理后就会知道,内部使用 Kernel + 注册插件 + 生命周期钩子函数 的实现方式,灵活的实现了各个不同的命令组合。

Taro 项目的初始化流程图:

Taro

使用 taro 开发时的不同平台构建命令,比如微信小程序的构建命令 taro build --type weapp,其核心也是使用 Kernel + 钩子的运行机制 实现,以及最终到达 webpack 构建阶段,只不过调用的是 build 钩子和平台专属编译 Plugin,下面我们具体看下 taro build 的源码部分

taro build

在一个 Taro 项目中 package.json 的 scripts 部分如下所示:

1
2
3
4
5
6
7
8
9
10
11
12
13
14
15
16
17
18
19
20
"scripts": {
"build:weapp": "taro build --type weapp",
"build:swan": "taro build --type swan",
"build:alipay": "taro build --type alipay",
"build:tt": "taro build --type tt",
"build:h5": "taro build --type h5",
"build:rn": "taro build --type rn",
"build:qq": "taro build --type qq",
"build:jd": "taro build --type jd",
"build:quickapp": "taro build --type quickapp",
"dev:weapp": "npm run build:weapp -- --watch",
"dev:swan": "npm run build:swan -- --watch",
"dev:alipay": "npm run build:alipay -- --watch",
"dev:tt": "npm run build:tt -- --watch",
"dev:h5": "npm run build:h5 -- --watch",
"dev:rn": "npm run build:rn -- --watch",
"dev:qq": "npm run build:qq -- --watch",
"dev:jd": "npm run build:jd -- --watch",
"dev:quickapp": "npm run build:quickapp -- --watch"
}

使用 Taro 的 build 命令可以把 Taro 代码编译成不同端的代码,然后在对应的开发工具中查看效果。

Taro 编译分为 dev 和 build 模式:

  • dev 模式(增加 –watch 参数) 将会监听文件修改。
  • build 模式(去掉 –watch 参数) 将不会监听文件修改,并会对代码进行压缩打包。
  • dev 模式生成的文件较大,设置环境变量 NODE_ENV 为 production 可以开启压缩,方便预览,但编译速度会下降。

可以看出,taro build 命令主要的参数是 type,在 dev 模式下,会增加一个额外的 watch 参数,基于这个印象,我们来看看运行 taro build 后会发生什么?

Kernel

首先,CLI 实例将会对命令行参数进行解析,然后进入到 build 操作

Taro

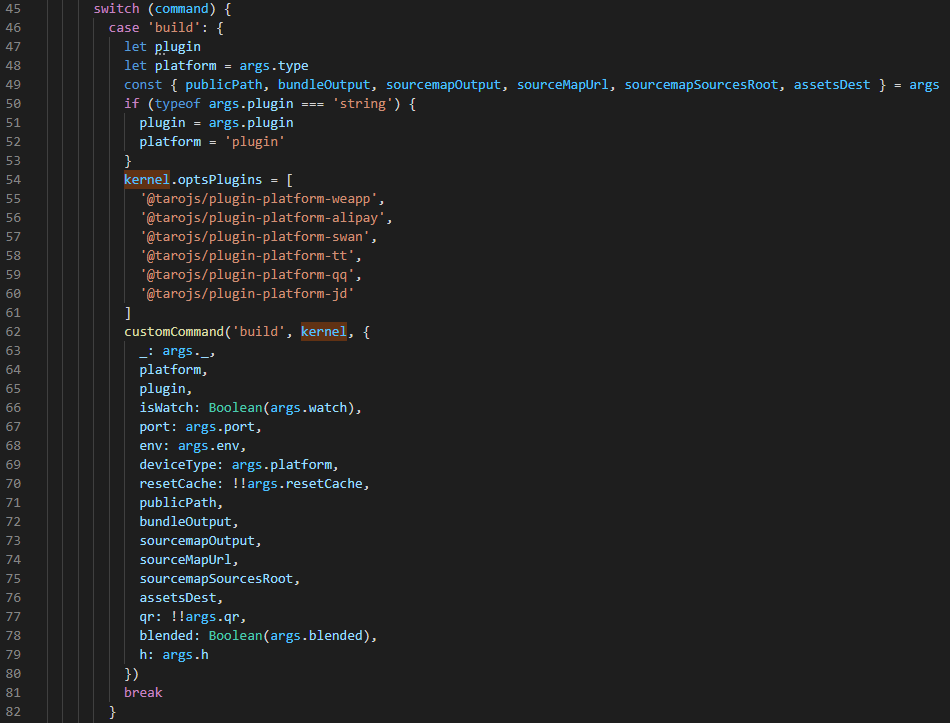
在上图的第 62 行运行的 build 函数,实际上是运行了 kernel.run() 函数如下图

Taro

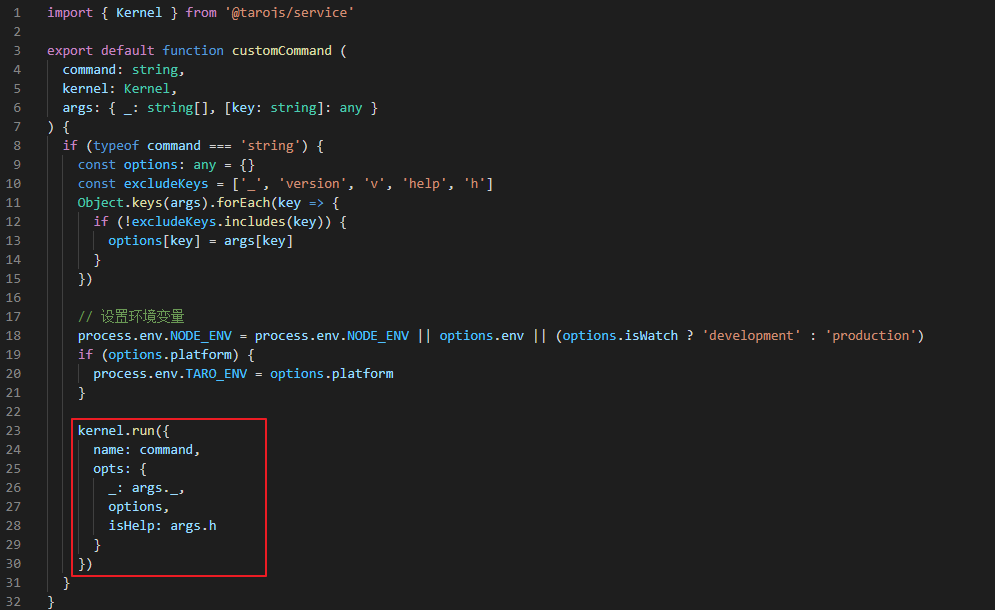
kernel.run() 函数具体做什么呢?

kernel.run

这一段是 Kernel 的核心内容,理解了这段就理解了 taro-cli 的工作模式

我们来具体分析下 kernel.run() 方法中主要做了什么,代码如下所示:

Taro

  • 第 282~294 行:初始化一些参数
  • 第 295 行:初始化项目配置、初始化项目路径信息、初始化项目插件;这一步是非常关键的准备工作,在执行完成后,所有的编译插件、平台编译插件都将被加载到 Kernel 实例上,供后续的编译程序使用。在装载完成后,将会触发 Kernel 的第一个钩子 - onReady
1
2
3
4
5
6
7
8
/* init内部的代码 */
async init () {
this.debugger('init')
this.initConfig()
this.initPaths()
this.initPresetsAndPlugins()
await this.applyPlugins('onReady')
}
  • 第 297 行:执行 Kernel 第二个钩子 - onStart
  • 第 313~315 行:这里的 opts.platform 其实就是运行 taro build 时传入的 type 参数,比如 weapp、qq、h5…。然后根据平台获取对应的编译配置
  • 第 322 行:运行第三个钩子,也就是 kernel.run() 函数传入的钩子 - build 钩子

build 钩子

Taro

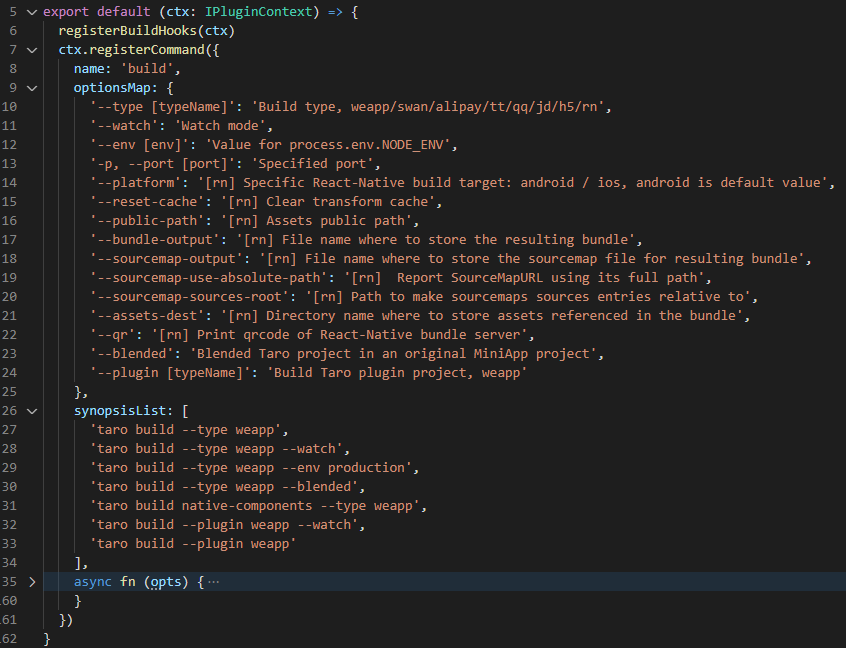
从上图代码可以看出,build 钩子有我们比较熟悉的参数,比如 –type、–watch,还有一些比较少用到的,这里就不作展开了。

这里我们重点关注 fn 函数,当钩子被触发时,就是执行了 fn 函数

Taro

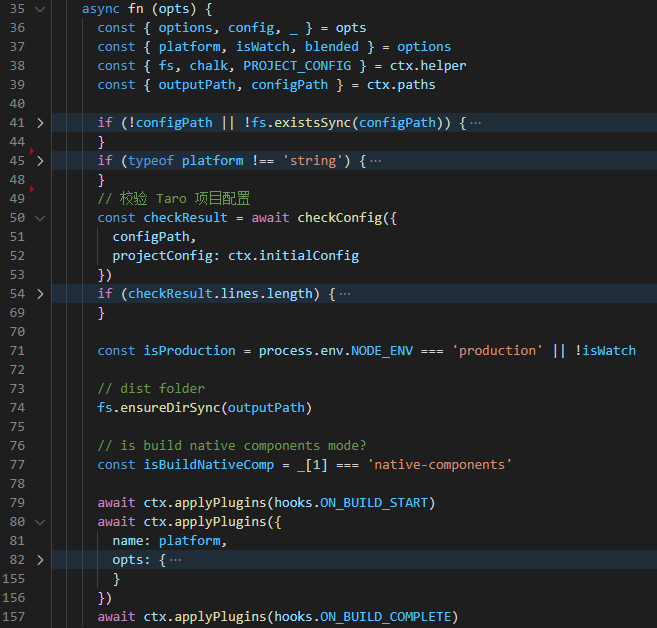
从上图代码可以看出,fn 的实现并不复杂,我们来分析一下其中几行关键代码:

  • 第 50 行:检查项目相关配置,这里检查的配置文件其实就是项目中的 config/index.js 配置文件。
  • 第 79 行:构建开始,触发 onBuildStart 钩子。这个钩子在文档中也有介绍,可以通过插件对代码编译过程进行拓展(如下图)。

    来自 Taro 文档中的内容 编译过程扩展 ​
    同时你也可以通过插件对代码编译过程进行拓展。
    正如前面所述,针对编译过程,有 onBuildStartonBuildFinish 两个钩子来分别表示编译开始,编译结束,而除此之外也有更多 API 来对编译过程进行修改,如下:

    • ctx.onBuildStart(() => void),编译开始,接收一个回调函数
    • ctx.modifyWebpackChain(args: { chain: any }) => void),编译中修改 webpack 配置,在这个钩子中,你可以对 webpackChain 作出想要的调整,等同于配置 webpackChain
    • ctx.modifyBuildAssets(args: { assets: any }) => void),修改编译后的结果
    • ctx.modifyBuildTempFileContent(args: { tempFiles: any }) => void),修改编译过程中的中间文件,例如修改 app 或页面的 config 配置
    • ctx.onBuildFinish(() => void),编译结束,接收一个回调函数
  • 第 80 行:触发对应的平台钩子,小程序项目中的话,此处应为 weapp 钩子

weapp 钩子

Taro 的钩子机制实现的非常精妙,同时也使我们的源码阅读变得更加方便,那么我们只需要找到对应的 weapp 文件即可,这里我们直接关注 fn 函数

1
2
3
4
5
6
7
8
9
10
11
12
13
14
15
16
17
18
19
20
import Weapp from './program'
import type { IPluginContext } from '@tarojs/service'

// 让其它平台插件可以继承此平台
export { Weapp }

export interface IOptions {
enablekeyboardAccessory?: boolean;
}

export default (ctx: IPluginContext, options: IOptions) => {
ctx.registerPlatform({
name: 'weapp',
useConfigName: 'mini',
async fn({ config }) {
const program = new Weapp(ctx, config, options || {})
await program.start()
},
})
}

IPluginContext 定义了一个类型接口,包含获取当前所有挂载的插件和当前所有挂载的平台以及一些配置项,注册和编译的相关方法

我们具体看下 Weapp 对象内部实现的代码

Taro

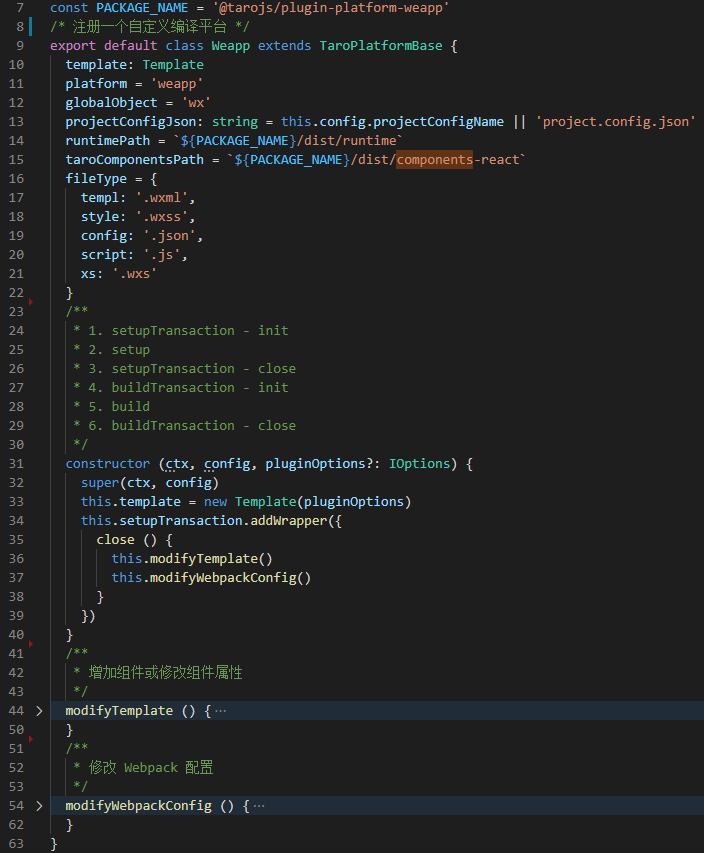
从代码中可以看到 Weapp 类中定义了一些配置参数,路径和内部的方法,继承自 TaroPlatformBase 类,代码如下所示

这个类实现关键的方法如下:

调用 start() 方法开始执行编译操作

1
2
3
4
5
6
7
/**
* 调用 mini-runner 开启编译
*/
public async start () {
await this.setup()
await this.build()
}
  • 首选需要清空之前编译的 dist 文件夹,输出编译提示,根据项目配置生成微信小程序的 project.config.json
1
2
3
4
5
6
7
8
9
10
11
12
13
14
15
16
17
18
19
20
21
22
23
24
25
26
27
28
29
30
31
32
33
34
35
36
37
38
39
40
41
42
43
44
45
46
47
48
49
50
51
52
53
54
......
// 清空 dist 文件夹
private async setup () {
await this.setupTransaction.perform(this.setupImpl, this)
this.ctx.onSetupClose?.(this)
}
private setupImpl () {
const { needClearOutput } = this.config
if (typeof needClearOutput === 'undefined' || !!needClearOutput) {
this.emptyOutputDir()
}
this.printDevelopmentTip(this.platform)
const { printLog, processTypeEnum } = this.ctx.helper
printLog(processTypeEnum.START, '开发者工具-项目目录', `${this.ctx.paths.outputPath}`)
if (this.projectConfigJson) {
// 生成 project.config.json
this.generateProjectConfig(this.projectConfigJson)
}
}
protected emptyOutputDir () {
const { outputPath } = this.ctx.paths
this.helper.emptyDirectory(outputPath)
}
// 输出编译提示
protected printDevelopmentTip (platform: string) {
if (process.env.NODE_ENV === 'production' || process.env.NODE_ENV === 'test') return

const { isWindows, chalk } = this.helper
let exampleCommand

if (isWindows) {
exampleCommand = `$ set NODE_ENV=production && taro build --type ${platform} --watch`
} else {
exampleCommand = `$ NODE_ENV=production taro build --type ${platform} --watch`
}

console.log(chalk.yellowBright(`Tips: 预览模式生成的文件较大,设置 NODE_ENV 为 production 可以开启压缩。
Example:
${exampleCommand}
`))
}
/**
* 生成 project.config.json
* @param src 项目源码中配置文件的名称
* @param dist 编译后配置文件的名称,默认为 'project.config.json'
*/
protected generateProjectConfig (src: string, dist = 'project.config.json') {
if (this.config.isBuildNativeComp) return
this.ctx.generateProjectConfig({
srcConfigName: src,
distConfigName: dist
})
}
......
  • 在准备 miniRunner 配置参数,其实就是微信小程序对应的编译参数,加载 miniRunner 包,并运行 miniRunner,生成新的 dist 文件
1
2
3
4
5
6
7
8
9
10
11
12
13
14
15
16
17
18
19
20
21
22
23
24
25
26
27
28
29
30
31
32
33
34
35
36
37
38
39
40
41
42
43
/**
* 准备 mini-runner 参数
* @param extraOptions 需要额外合入 Options 的配置项
*/
protected getOptions (extraOptions = {}) {
const { ctx, config, globalObject, fileType, template } = this

return {
...config,
nodeModulesPath: ctx.paths.nodeModulesPath,
buildAdapter: config.platform,
globalObject,
fileType,
template,
...extraOptions
}
}
/**
* 调用 mini-runner 开始编译
* @param extraOptions 需要额外传入 @tarojs/mini-runner 的配置项
*/
private async build (extraOptions = {}) {
this.ctx.onBuildInit?.(this)
await this.buildTransaction.perform(this.buildImpl, this, extraOptions)
}
private async buildImpl (extraOptions) {
const runner = await this.getRunner()
const options = this.getOptions(Object.assign({
runtimePath: this.runtimePath,
taroComponentsPath: this.taroComponentsPath
}, extraOptions))
await runner(options)
}
/**
* build with webpack
* 返回当前项目内的 @tarojs/mini-runner 包
*/
protected async getRunner () {
const { appPath } = this.ctx.paths
const { npm } = this.helper
const runner = await npm.getNpmPkg('@tarojs/mini-runner', appPath)
return runner.bind(null, appPath)
}

miniRunner 小窥

在最后,taro buildkernel.run 走到了 miniRunner,那 miniRunner 是什么呢?

其实 miniRunner 就是 webpack 编译程序

Taro

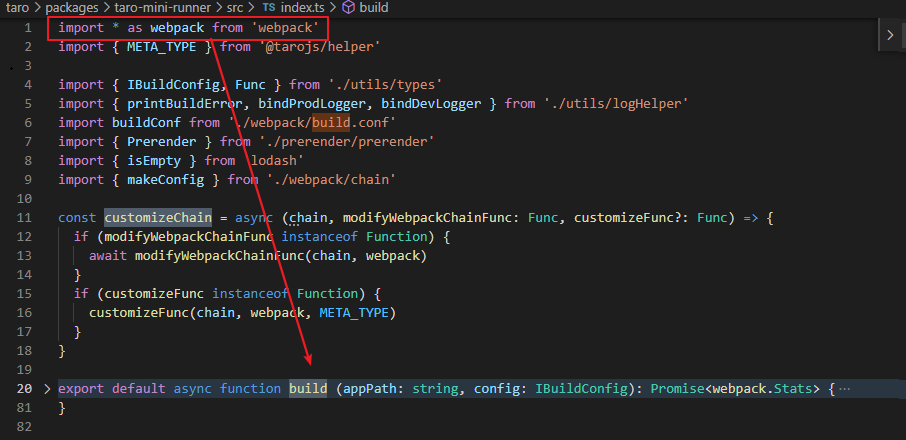
在收集好对应配置后,最后进入到了 webpack 编译代码

1
2
3
4
5
6
7
8
9
10
11
12
......
if (newConfig.isWatch) {
bindDevLogger(compiler)
compiler.watch({
aggregateTimeout: 300,
poll: undefined
}, callback)
} else {
bindProdLogger(compiler)
compiler.run(callback)
}
......

经过编译后,我们对应平台的小程序代码就被编译出来了

小结

在本章 taro build 中,我们更加能体会到 Kernel + 钩子机制 的精妙之处。这种实现解耦了模块,使得模块之间得以分治。
最后的 miniRunner 可以说是 taro build 中编译过程的最后一步。这部分的实现应该不算 Taro 源码解读的部分,更像是 webpack 的使用解读,后面在详细介绍 miniRunner 具体所做的工作以及它是如何将 React、Vue 代码编译成小程序端代码的,这里就不在多说了。

参考

Taro 技术揭秘:taro-cli
NervJS/taro